Mastering Manufacturing with Business Central: How to Set Up Subcontracting Operations
If you're a manufacturer who occasionally or frequently outsources parts of your production process—like painting, assembly, or surface finishing—then subcontracting in Microsoft Dynamics 365 Business Central is a feature you'll want to use.
In this blog, part of our Mastering Manufacturing with Business Central series, we'll walk through how to configure subcontracting operations from start to finish. You'll learn how to modify your routing, set up outsourced work centres, control component consumption, and lay the foundation for automated vendor purchase orders.
Let's dive in.
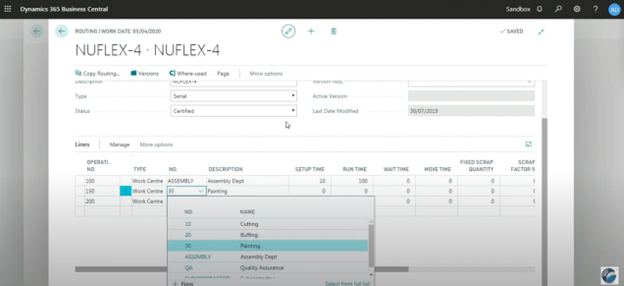
Step 1: Modify Your Routing to Include Subcontracting
Your production routing defines each step of your manufacturing process. To outsource a step (e.g., Painting), insert a new routing line for that process and designate it as an external operation.
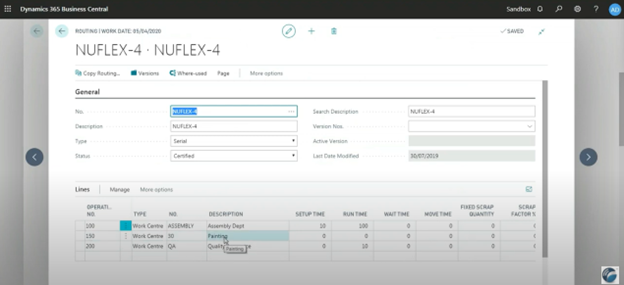
In the demo, the routing step for painting was deliberately left without time values (run time, move time, wait time), but this is not required. In a real-world setting, these values can reflect transit or turnaround times from your vendor. Including these times may help you plan for lead times more accurately, especially if the subcontractor has long turnaround periods or if you frequently rely on them for high volumes.
Tip: If your vendor charges a flat fee per unit, skip the time values and configure cost on a per-unit basis instead. But if the cost varies with time spent, include setup and run times to calculate the correct labor cost.
Step 2: Create or Edit the Outsourced Work Centre
Once your routing is in place, you need to configure the Work Centre that represents your subcontractor.
Key Fields to Configure:
- Subcontractor No.
This ties the work centre to a Vendor Card in Business Central. Any purchase orders for this step will reference this vendor. - Unit Cost Calculation
Choose "Units" if you're charged per item or "Time" if the cost is based on duration.
➤ In this example, the vendor charges $2.00 per unit, so producing 10 units results in a $20 subcontracting fee.
- General Posting Group (Optional)
Assigning a different product posting group allows your accounting team to track and report subcontracting costs separately from internal manufacturing. This is especially useful if your finance team needs visibility into outsourced costs for budgeting, cost analysis, or pricing strategies.
Real-World Scenario:
Some manufacturers toggle between internal and outsourced processes based on capacity. If your internal paint line is down or overloaded, simply edit the routing in that specific production order to swap in the outsourced work centre. No need to update the item master.
Step 3: Component Consumption at the Vendor Location
Some subcontractors require additional components to complete their part of the process. For example, they may need packaging materials or mounting brackets that you supply.
In these cases:
- Assign a routing link code in your routing line to indicate which BOM components are tied to that step.
- Assign a location code in the work centre to specify where those components are drawn from.
Why This Matters:
- The system knows to consume components at the subcontractor location, not your main warehouse.
- You can use transfer orders to ship components to that location or purchase directly into that location.
- You can even use stockkeeping units (SKUs) and min/max levels to automate replenishment to the vendor.
Advanced Planning:
MRP in Business Central will recognize demand at the subcontractor's location and recommend purchase or transfer orders accordingly. This is critical if your vendor is working on multiple jobs or you maintain regular volume with them.
Step 4: Enable the Subcontracting Worksheet
Once everything is configured, you're ready to move to production. When a released production order includes an outsourced routing step, the Subcontracting Worksheet becomes active.
In the next blog, we'll show you how to:
- Use the worksheet to calculate subcontracting requirements
- Automatically generate POs for the subcontracted operation
- Track the service cost against the production order
- Post receipt and invoice for the service
But for now, know that this worksheet is your launchpad for converting subcontracting setup into real-time execution.
Final Thoughts: Laying the Foundation for Outsourced Efficiency
Setting up subcontracting in Business Central requires a solid understanding of routing, work centres, costing, and inventory control—but once configured, the benefits are significant:
- You gain transparency into outsourced operations.
- Your costing becomes more accurate and traceable.
- The system automatically generates POs based on production needs.
- You retain ownership and control over your inventory, even when it's offsite.
Subcontracting is not just a workaround—it's a strategic tool for expanding your capacity and staying lean.
Watch the full video: Microsoft Dynamics 365 Business Central Manufacturing Series Part VI: Subcontracting
Contact WebSan Solutions to streamline subcontracting in your manufacturing environment.