Importing Data is as easy as 1-2-3!
Are you juggling two CRM systems because you have an overwhelming amount of data in your existing system, and you do not even know where to begin as you make the transition to Dynamics 365? Data importing aside, is a bigger concern loss of data and/or data integrity? Or do you have salespeople attending events and need a quick and easy process for getting all the data which has been gathered into D365?
Your search is over. Importing data is an important task you will need to perform at one point or another. Whether it be when your Dynamics 365 environment goes live or later when you need to bring in data which has been collected in another application. No matter how you slice it, the need will arise! You can import data into standard and customized fields of out of the box and custom entities in Dynamics 365. Not only that, you can also include related data, such as activities and notes. To assure data integrity, you can enable duplicate detection to prevent importing duplicate records.
A few pointers as you prepare your data for import:
Export data from your existing system in one of the following formats: comma-separated values (.csv), XML Spreadsheet 2003 (.xml), Compressed (.zip) or text files. Or save an Excel file, which has had data entered into it, as a .csv or .xml.
Once you have your raw data ready, the next thing you need to do is to prepare your data import template. There are a handful of ways to create a template for your data import into Dynamics 365.
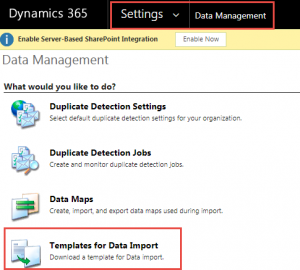
1. Use Preconceived Templates. Go to Settings > Data Management > Templates for Data Import > Find the template for the entity you want to perform a data import for.
2. Create an Advanced Find Query. Perform an Advanced Find query, add the necessary columns, and then Export to Excel. Once exported replace the existing data with your own data.

3. Use an Existing Entity View. Navigate to the desired entity, select your preferred view, then select Export to Excel from the command bar. Once exported replace the existing data with your own data.

4. Create Your Own Template. In Excel, create your own template by adding column headers, which represent field names.
Once you have the template ready, you can copy and paste your data into the template. Be careful, Dynamics 365 is picky on formatting, make sure you paste as plain text.
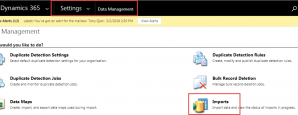
Now you are ready to import your data. Go to Settings > Data Management > Imports and from the navigation area choose Import Data.
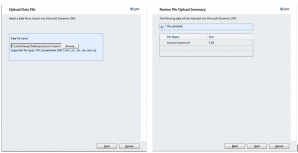
Browse to the location where you have saved the file, and select Next. On the next screen, confirm that the file is correct and select Next again.
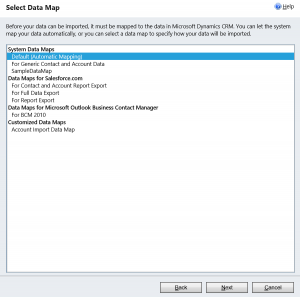
Choose to have the system map the data automatically, the first selection in the list. Conversely, you can also use a Customized Data Map. After making your selection, select Next.
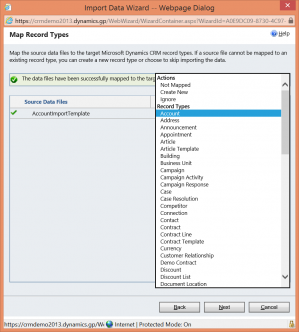
Choose the entity that you are mapping to.
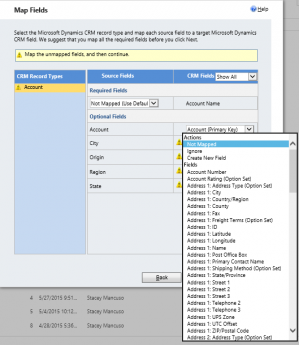
The system will detect the fields. Verify that they match as you intended. For any fields that do not map automatically or are flagged, select the field that you want to map it to, or if needed, create a new field at that time. Once completed, select Next.
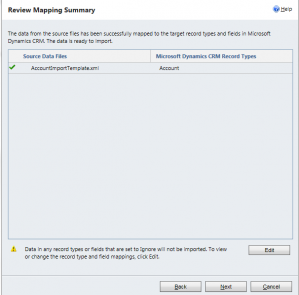
Verify the import file again and select Next.
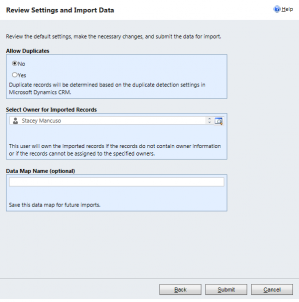
On the next screen make your desired selections. To save the data map you have created, to use in the future, enter a descriptive name in the Data Map Name field shown below. Select Submit to execute the import. You can check the status of the import or view errors by navigating to Settings > Data Management > Imports.
And with that you have the basics of how to successfully import data into Dynamics 365. We have only scratched the surface with this amazing tool, if you need assistance or would like to learn even more about importing data, please feel reach out to our support team at